Wednesday, June 30, 2010

I've been kind of busy.

Ok. So I got a new toy! A new sewing machine! Love it! Who knew having a new sewing machine would be so much fun! I actually think I love to sew now. It sure is nice to have the right tools for the job.
Anyway, I found some fab fabric and patterns up at Scrapbooks Etc. (http://scrapbooks-etc.com/2009/) and have been sewing away.


I made my friend Kim & I matching aprons and headbands for while we were at girls camp doing the craft. The aprons were reversible and so fast to put together. I love the scalloped edge and the big pocket. If I was going to sew this pattern again, I would make the pocket into 2, not 3 as is shown here in this photo.


Here is another example of the bottle cap charm on a very awesome necklace that my friend Kim came up with. She is so talented! We got so many compliments on them!

I just finished this cupcake apron tonite and need to clip all the strings off of it. I just love this fabric. I plan to make my niece a few bibs from the matching scraps of these. Maybe in a couple days I will have some free time to do that.

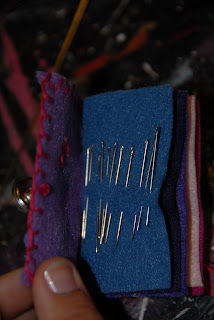
I found an idea online and I can't remember where, but when I loved the idea of a little needle book made out of felt to keep your needles in. This is my quickie version.
One more thing...
Check out this sign...quickie cut out for our ward camp.

Tuesday, February 9, 2010

New Valentine's Day Craft!


So this little cutie was done last friday. My sister-in-law came up with the idea one day, and it is super cute! Love it! The large heart is out of 1/4" plywood, so it won't be too heavy. The birds are out of 3/4" pine, and then the stick is grapevine from my backyard.

Tuesday, February 2, 2010

Bottle cap charms

This is the second option we are doing at our girls camp this year. We are tying these bottle cap charms onto a chinese cord necklace and every year the girls can add to it, if they want. Or they can take this and attach it to their keychain or their scripture bag. Some of the older girls may not want to have jewelry like that, so there are other options. And it works out to being so inexpensive. The little alphabet letters were run through the printer on shrinky dink paper and then shrunk down and how cute they are. The sayings on the bottle caps were also printed on the printer, put into the bottle cap and then covered with crystal laquer. We punched holes into the bottle cap with the crop-a-dile. That thing punches through anything! Awesome.

Monday, February 1, 2010

Nativity Book


This is a book I have been thinking about for several years now, and truthfully, wasn't quite sure how I was going to do it. I have been very frustrated with reading the scriptures on Christmas Eve, because I wanted to do the Nativity, but nobody wants to wait while you find it and also while you flip back and forth between Luke and Matthew. My kids are getting older and they don't want to dress up anymore, either. A friend of mine, Caroline, (her blog is http://www.fuzzypear-caroline.blogspot.com ) who does some amazing books, had the idea to use canvases for the front and back cover, so that is what you see here. The interior pages are simply chipboard covered in cardstock on each side. The binding is accordian style and glued in place. It is a very sturdy book, and we actually used it on Christmas Eve to read the Nativity from. The scriptures are copied right off the online scriptures of the King James version of the Bible off of www.lds.org. In addition to that, there is info. on the wise men, the magi, angels, and all the names that Christ goes by with scripture references, as well as some other interesting details. It really is a keepsake. I am thinking about making it for gifts for my family next year. We will see how energetic I am feeling.


Jean Wallet


This is a little wallet we are planning for the craft at our stake girls camp. It is simply cut from an old used pair of jeans. Measurements are: 7" x 7". For instructions, email me. It is fairly simple and works out to be so cheap. under $1.00 per wallet, depending on what you do to embellish it. And it can look so different depending on how it's done, as you can see in the pictures. The ones above, were done by a friend of mine. Super cute.

We are giving the girls a quarter sheet of images printed on fabric that we ran through our printer before hand. This can be adhered using permanent fabric glue. They can also use stamps with the alphabet to add their initial. Easy. I also discovered that using torn fabric in a strip is so much cheaper than ribbon, and you can change it to distressed with ink. One other perk is that is useful. And all year long, when they use their wallet it will remind them of girls camp. Love that!

My 15 year old daughter made this one for her friend:


Friday, November 20, 2009

Simple Invite


My lovely sister is having a baby and I was lucky enough to be able to give her a shower. These are the simple, yet elegant, invites we sent out. Some of them had a little rose at the top instead of a ribbon bow. Joanne's ran out of the roses and I decided that the bows looked pretty as well.
How to: Print up the invite on your computer onto cardstock. Trim down to 5 in. sq. I used a Stampin' Up Big Shot with a square scallop die to cut the invite into the shape. You can cute 2-3 invites at a time & the good thing about this particular die is that it is clear so you can see to center the invites words. After all were cut, I then ran it back through the Big Shot using the embossing plate with the large polka-dots. Then using adhesive, fixed it onto some cardstock and adhered the rose or bow to the top. EASY!

Crocheting in Style

So, a few days ago, my daughter Haylee & I began our winter crochet projects. We have been doing this for the past couple of years, along with my new sister-in-law, Bekah, who last year became obsessed with crocheting also. I purchased this book at Barnes & Noble, mainly because I liked the hats & it seemed pretty easy. I finished a really cute magenta flapper style hat and added a crocheted flower, which I tied on to it, a week ago. I didn't take a picture of it before I gave it away for a birthday present to a friend. Drat! But, let me just say, it was CUTE!


I am almost finished with this hat shown below, & am probably going to give it to my neighbor down the street as she is going to New York in a few weeks and told me she didn't have any. I really do like it. In fact, after I am finished, I might just make me one.
Haylee is working on a multi-colored aviator style hat & it is going to be cute, as well. So, Diane, this is for you. Good luck!